Sort View
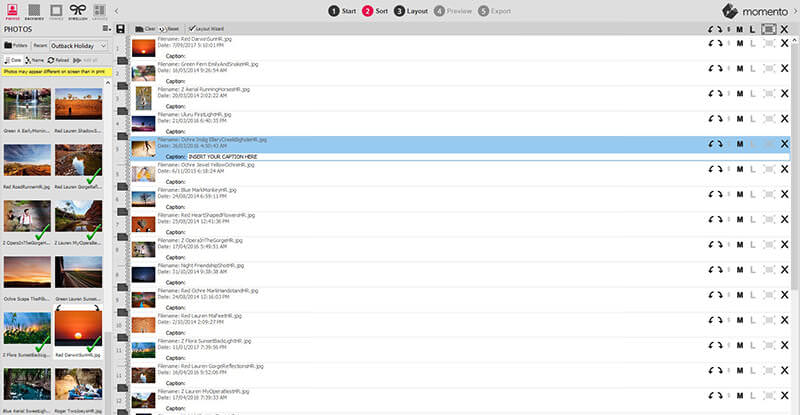
Sort View is one of the two main ways you can view and edit your design. Unlike Layout View that presents your design in a detailed page by page format, Sort presents an overview of your entire project as a list of icons on one screen. In Sort View you can easily group and reorder photos, insert and delete page breaks, set relative sizes, and make changes to multiple photos or pages at once.
Sort View is a great place to start if you are working on a family history book and you want to quickly sequence your photos by date by moving them up and down the list, or if you want to add customised captions to all of the photos in your book. It's a faster way to make edits to large groups of photos in your project.
Accessing Sort View

There are three ways you can access Sort View:
- Click the Sort tab in the canvas sub menu
- Use the F2 Keyboard Shortcut
- Go to File Menu > Views > Sort
Features in Sort View
Below is a summary of the many features and functionality available in Sort View. Click on any link to view the details.
- Add photos
- Delete photos
- Sequence photos
- Add or delete page breaks
- Add captions
- Rotate photos
- Set Relative Sizes
- Set Photo as Page Background
Select a photo or photos
To apply any of the functions listed above, you must first select the photo or group of photos to add, edit or adjust.
To select a single photo
- Click once on the photo
- The photo/row will highlighted blue to confirm it is selected
To select all photos on the page
- Click anywhere in the grey margin area at the left of the list
- All photos/rows on the page will be highlighted blue to confirm they are all selected
To select a continuous range of photos
- Click the first photo in the range
- Then hold down the Shift key and click the last photo in the range
- All the photos between the two selected photos (including the two selected photos) will be highlighted in blue
To select multiple, non-sequential photos
- Click the first photo
- Then hold down the Ctrl (Control) key
- Click on all the other photos you'd like selected
- Each selected photo will be highlighted in blue

Drag-and-drop editing
To move or reorder a photo or photos in Sort View you will need to use the drag-and-drop editing technique. Drag-and-drop editing is just like it sounds:
- Select: You select the photo or content you want to move by clicking on it once
- Drag: Press the left mouse button down and slide the mouse to a new position
- Drop: position the photo in place by removing your finger from the mouse
Add photos
Just as in Layout View, photos or any other content can be added to your project by dragging them from the Content Panels to the canvas. The photo or photos will be automatically inserted at the point you have dragged them on to the list. You can easily reorder the sequence of the list at any time.
Delete photos
- You can remove a photo from your design by:
- Selecting the photo or photos you wish to remove
- Click the X icon on the far right of the row you have selected
- Use the Delete key
- Go to Edit Menu > Delete

You can always tell if you have selected a photo properly as the photo and its related information will be highlighted in blue. Note : This process will not delete the photo from your computer, it will only remove the photo from your view.
Sequence photos
Changing the order or moving photos from one page to another is easy in Sort View by using the drag and drop editing technique:
- Select the photo or photos you wish to move
- Drag-and-drop the photos to their new position in the Sort list
- The insertion point is indicated by the cursor (a flashing horizontal line)
Add or delete page breaks
A Page Break indicates where one page ends and another page starts. In Sort View, Page Breaks are represented by a dark grey page icon in the left margin. The image below includes the number 2 above the dark grey page icon, indicating that it is Page 2 of the photobook. Likewise, Page 3 of the book appears below the page break with a number 3 in the left margin.
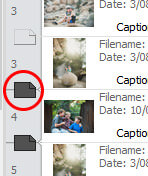
To split one page into two pages:
- Click the clear page icon in the left margin between two photos on the same page
- The page icon will turn dark gery indicating that a page break now exists between the photos
- The page is now split into two pages
To remove all page breaks in a photobook:
- Click on the
 icon at the top of Sort View
 - This will result in all photos appearing on a single page in the book, so be sure to enter page breaks manually, as you need
Note: You will not be able to proceed to Layout View if there are more than 24 photos per page
To evenly distribute page breaks throughout a project:
- Click on the
 icon at the top of Sort View.
 - You will be asked how many photos you would like to place on each page. Type in a number and click the OK button.
Rotate photos
Sometimes a photo will appear in your Sort list upside down or sideways because this is the way the photo has been saved on your computer. It is very simple to correct this in Sort View by using the Rotate 90° tools on the far right of each row. To correct this:
- Select the photo you wish to rotate. The photo and all its supporting information will be highlighted in blue.
- Click on the Rotate 90° Left icon or the Rotate 90° Right icon until your photo appears in the correct orientation
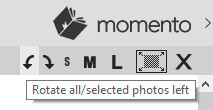
Note: It is easy to rotate all the photos in your project at once - or even a selection of photos - by using the same technique but rather than clicking the icon at the end of each individual row, click on the Rotate 90° icons in the grey bar at the top of the canvas.
Set Relative Sizes
Another benefit of Sort View is that you can quickly set the size of photos relative to others by using the S, M, L and Background icons on the far right of each row. Depending on the size you choose for each photo, some photos will appear smaller or larger on the page when you move through to Layout View. You can easily edit and adjust the sizing in Layout View.

Note: It is easy to resize all the photos in your project at once - or even a selection of photos - by using the same technique but rather than clicking the icon at the end of each individual row, click on the S, M or L icons in the grey bar at the top of the canvas.
Set Photo as Background
To set a photo as the background image for a page: 
- Select the photo you wish to use for the page background.
- Click on the Set Photo as Page Background icon (see above) to the right of the photo
- When you move to Layout View the photo will fill the whole page as the background image
- For more information please visit the Backgrounds page
Note: You can also set the first photo of every page to be the background, by clicking on the background icon at the very top of the screen.
Add captions
A caption is a short text description that accompanies a photo to provide context or details about the photo, just as you see in the newspaper i.e. "The Prime Minister greets the crowd with a wave" or "Greg's Birthday Party" or "Sunrise over the Indian Ocean". In the Momento software you can manually or automatically add captions to all or individual photos.
To add a caption to a single photo:
- Click on the photo you wish to add a caption to
- Click inside the Caption text field
- The cursor will flash indicating that you can start typing
- Type your caption text
- Press Enter or click on another part of the screen to record your caption

Moving to Layout View
Once you have made all your sequencing, rotation, sizing and page break selections in Sort View, you can move through to Layout View to see your designs page by page and make any edits or adjustments you like by clicking on the Layout tab at the top of the screen. Likewise, you can also easily jump back to Sort View at any stage of your design by clicking on the Sort tab.
The Layout Wizard
When moving from Sort View to Layout View you must choose a layout option in the Layout Wizard. The Layout Wizard will appear and ask whether it should create new layouts for changed pages only, for all pages or no pages. Your choice will define how the software automatically lays out your pages as you move through to Layout View. This is the process that occurs when the Layout Wizard check box in Sort View is checked.
Layout Wizard check-box
If you do not want Momento to automatically layout your pages with the changes you have made in Sort View, un-tick the Layout Wizard check box at the top of the Sort View screen. You will find that any photos or captions you added are sitting in the top left of the page, stacked one on top of the other, rather than appearing in a good-looking layout. You can simply position the content yourself.